Soil pH is a critical factor in determining the health and productivity of your garden or farm. It affects nutrient availability, microbial activity, and plant growth. Testing soil pH is a straightforward process that can save you time, money, and frustration by ensuring your plants thrive. In this guide, we’ll explore why soil pH matters, how to test it accurately, and practical steps to adjust it.
Why Soil pH Matters
Soil pH measures the acidity or alkalinity of your soil on a scale from 0 to 14, with 7 being neutral. Soils with a pH below 7 are acidic, while those above 7 are alkaline. Most plants prefer a slightly acidic to neutral pH (6.0–7.0), but specific crops, like blueberries (4.5–5.5) or asparagus (7.0–8.0), have unique requirements.
Interesting Stats and Facts
Nutrient Availability: According to the University of Minnesota Extension, soil pH directly impacts nutrient availability. For example, phosphorus is most available at a pH of 6.5, while iron becomes less available above 7.0.
Crop Yield Impact: A 2019 study in the Journal of Soil Science found that correcting soil pH to optimal levels can increase crop yields by up to 20% in acidic soils.
Global Soil pH Variation: The USDA reports that 50% of arable soils worldwide are too acidic (pH < 5.5) for optimal crop production, particularly in tropical regions.
Historical Context: Farmers in ancient Mesopotamia (circa 2000 BCE) used ash to neutralize acidic soils, an early form of pH correction.
Why It’s Important
Think of soil pH as the “gatekeeper” of your soil’s nutrient bank. If the pH is too high or low, nutrients like nitrogen, phosphorus, and potassium get locked away, even if they’re present in abundance. This is like having money in a bank but no access to your account. Testing and adjusting soil pH ensures your plants can “withdraw” the nutrients they need to grow.
Methods to Test Soil pH
There are several ways to test soil pH, ranging from DIY home kits to professional lab analysis. Each method has its pros and cons, so choose the one that fits your needs, budget, and level of precision.
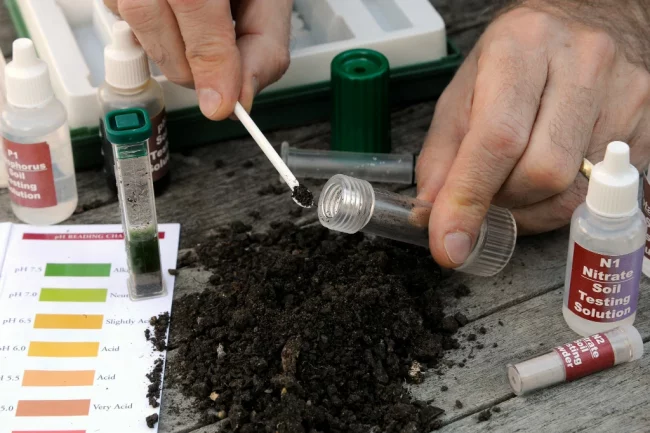
1. DIY Soil pH Test Kits
Best for: Home gardeners, small-scale farmers, and beginners.
How It Works:
Purchase a soil pH test kit from a garden center or online (prices range from $5–$20).
Collect a soil sample from 4–6 inches below the surface, avoiding roots and debris.
Mix the soil with distilled water and add the testing solution or powder as per instructions.
Compare the resulting color to the kit’s pH chart.
Pros:
Affordable and widely available.
Results in minutes.
Easy to use for beginners.
Cons:
Less accurate than lab tests (may vary by ±0.5 pH units).
Limited to pH; doesn’t test nutrient levels.
Example: Jane, a backyard gardener, used a $10 test kit to check her tomato bed’s pH. She discovered it was 5.5 (too acidic) and added lime to raise it to 6.5, resulting in healthier plants and a bumper crop.
2. Digital pH Meters
Best for: Frequent testers and those seeking reusable tools.
How It Works:
Insert the probe of a digital pH meter (priced $15–$50) into a soil-water slurry or directly into moist soil.
Wait for the digital display to show the pH reading.
Pros:
Reusable and cost-effective over time.
More precise than color-based kits (±0.2 pH units).
Portable for testing multiple areas.
Cons:
Requires calibration with buffer solutions for accuracy.
Probes can degrade over time if not maintained.
Tip: Clean the probe after each use and store it properly to extend its lifespan.
3. Professional Soil Testing Labs
Best for: Farmers, landscapers, and serious gardeners needing detailed analysis.
How It Works:
Collect soil samples from multiple spots in your garden or field (mix for a composite sample).
Send the sample to a local agricultural extension service or private lab (e.g., Cornell University Soil Health Lab or A&L Labs).
Receive a report detailing pH, nutrient levels, and amendment recommendations.
Pros:
Highly accurate and comprehensive.
Provides nutrient and organic matter data alongside pH.
Tailored recommendations for your soil type.
Cons:
More expensive ($20–$100 per sample).
Results take 1–2 weeks.
Stat: The USDA’s Natural Resources Conservation Service notes that 70% of U.S. farmers who use lab soil testing report improved crop performance after following recommendations.
4. Home Remedies (Vinegar and Baking Soda Test)
Best for: Quick, rough estimates when no tools are available.
How It Works:
Place two small soil samples in separate containers.
Add vinegar to one; if it fizzes, the soil is likely alkaline (pH > 7).
Add baking soda and water to the other; if it fizzes, the soil is likely acidic (pH < 7).
No fizzing suggests a neutral pH.
Pros:
Uses common household items.
Free and quick.
Cons:
Very imprecise; only indicates broad pH ranges.
Not suitable for fine-tuning soil management.
Analogy: This method is like using a fever to guess if someone is sick—it tells you something’s off but not the exact problem or solution.
Step-by-Step Guide to Testing Soil pH
Follow these steps for accurate results, regardless of the testing method:
Choose the Right Time: Test in early spring or fall when soil is moist but not waterlogged. Avoid testing after heavy rain or fertilizer application.
Collect Samples:
Use a clean trowel to dig 4–6 inches deep.
Take 5–10 samples from different spots in your garden or field.
Mix samples in a clean bucket for a composite sample.
Prepare the Sample:
Remove rocks, roots, and debris.
Air-dry the soil (don’t use heat, as it can alter pH).
Test the Soil:
Follow the instructions for your chosen method (kit, meter, or lab submission).
Record results for each area tested.
Interpret Results:
Compare your pH to the ideal range for your plants (e.g., 6.0–6.5 for tomatoes, 4.5–5.5 for azaleas).
Note any extreme values that need correction.
How to Adjust Soil pH
If your soil pH is outside the optimal range, you can adjust it using amendments. Always retest after 6–12 months to monitor changes.
Raising Soil pH (Making Soil Less Acidic)
Amendment: Agricultural lime (calcium carbonate) or dolomitic lime (adds magnesium).
Application: Spread 2–5 pounds per 100 square feet for sandy soils, or 5–10 pounds for clay soils. Work into the top 6 inches.
Timeframe: Takes 3–6 months to fully adjust pH.
Example: A farmer in Iowa raised their cornfield’s pH from 5.8 to 6.5 with lime, boosting yields by 15% the next season.
Lowering Soil pH (Making Soil More Acidic)
Amendment: Elemental sulfur, iron sulfate, or organic matter (e.g., pine needles, peat moss).
Application: Apply 1–2 pounds of sulfur per 100 square feet. Avoid over-application, as it can harm plants.
Timeframe: Takes 1–3 months to see results.
Example: A gardener in Oregon lowered their rose garden’s pH from 7.2 to 6.0 with sulfur, improving flower vibrancy.
Caution: Always follow lab or extension service recommendations for amendment quantities, as over-correcting can harm soil health.
FAQ: Common Questions About Soil pH Testing
Q: How often should I test my soil pH? A: Test every 1–2 years for gardens or every 2–3 years for established farms. Test more frequently if you’ve recently amended the soil or notice plant stress.
Q: Can I use tap water for soil pH testing? A: Distilled water is best, as tap water’s pH or minerals can skew results. If unavailable, use rainwater or let tap water sit for 24 hours to neutralize chlorine.
Q: Why do my plants look unhealthy even with the right pH? A: pH is just one factor. Check for nutrient deficiencies, pests, diseases, or poor drainage. A lab test can provide a fuller picture.
Q: Are digital pH meters worth the investment? A: Yes, for frequent testing or larger gardens. They’re reusable and more precise than kits, but proper calibration is essential.
Q: Can I test soil pH in winter? A: Yes, but frozen or waterlogged soil can give inaccurate results. Test when the soil is workable and moist.
Q: How long does it take to change soil pH? A: Raising pH with lime takes 3–6 months, while lowering pH with sulfur takes 1–3 months. Organic amendments work more slowly.
Practical Tips for Success
Test Multiple Areas: Soil pH can vary within a small garden. Test different beds or zones for accurate results.
Keep Records: Log your pH results and amendments to track changes over time.
Consult Experts: Contact your local agricultural extension service for region-specific advice or free/low-cost testing.
Start Small: If new to pH management, test and amend one area before tackling your entire garden.
Conclusion
Testing soil pH is an essential skill for anyone serious about gardening or farming. By understanding your soil’s pH, you can unlock its full potential, ensuring your plants get the nutrients they need to thrive. Whether you opt for a simple DIY kit, a digital meter, or a professional lab test, the process is accessible and rewarding. With the right tools and knowledge, you can transform your soil into a fertile foundation for bountiful harvests.
Take the first step today: grab a test kit, dig into your soil, and discover the pH that’s shaping your plants’ future. Your garden will thank you.